
There are so many different pour over-techniques and recipes out there today.
Some, such as the 4/6- or Rao-method, even have devoted followers.
I think that most methods can give you great tasting coffee. In the end, it’s about adjusting all the small details: Stuff like grind size, temperature, and water softness, etc. And of course, having great coffee beans is still the most important part (read about all that stuff here).
One big problem with all these methods, however, is that they tend to be complicated and to leave a lot to individual interpretation.
For that reason, I haven’t posted much on pour over-technique here on the blog, even though I consider this the best way to make coffee for most people.
Up until now, I have always thought that this is something people should dial in on their own.
Disclaimer: The following post is for intermediate home-brewers who already have the basics down of pour over. If you’re just starting then check this post instead.
The importance of agitation
The last six months, however, I have experimented with a very reliable brewing method. It combines some of the most important, yet rarely discussed aspects of pour over coffee.
The idea of this method is to control agitation precisely while achieving a full extraction and a long aftertaste.
Agitation seems to elude most baristas. It’s essential to the final cup, however, you don’t want too much. It’s a balancing act to get right.
Well, it was until now.
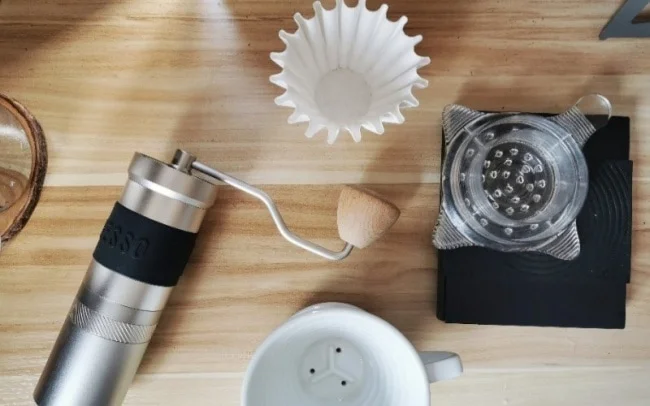
When I first got the Gabi Drip Master B in early 2019, I didn’t make a big fuss out of it. After all, it’s just a cheap plastic showerhead.
Since then, I have been using it more and more. Now, it’s become a mainstay in my brewing arsenal. I use it almost every single time I make drip coffee.
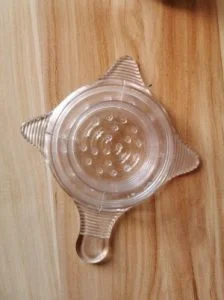
The good thing about this little device is that it takes a lot of human errors out of the manual coffee brewing equation, while allowing you to obtain a super long and clean aftertaste.
By creating a brew method around the device, I aim to take many variables of coffee brewing away. You can still play with grind size and ratio, but the idea is that the agitation will remain consistent from brew to brew.
Philosophy: How to Make Drip Coffee
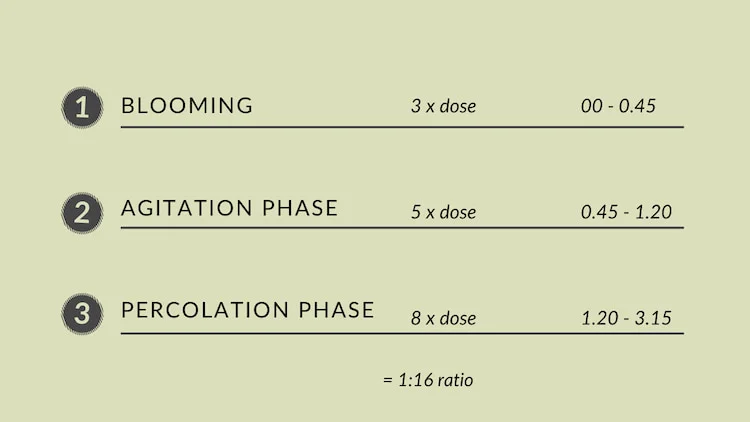
This brewing method consists of three phases.
- The blooming phase: Why we bloom has been described so many places so I’m not gonna go into it here. However, in contrast to many other people, I don’t like stirring the bed during this phase. Usually, there will not be enough water in the brew bed for this to make sense. It’s hard to keep consistent.
- The Agitation phase: During this phase the goal is to raise the temperature of the brew bed and perform all agitation needed for the brew.
- Percolation phase: During the last half part of the brew, we aim to brew while disturbing the brew bed as little as possible. This is what ensures the ultra-long finish that this method guarantees.
The Equipment
- Gabi Master B (Find it on Amazon)
- Kalita Wave. In reality, you can use most flat bottomed drippers. Or even a Hario V60. But to get similar results, you should opt for the Wave. I prefer the ceramic version.
(Sidenote: Don’t use the stainless steel Kalita as it has a prolonged flow rate compared to the other models. Or if you do — make sure to ‘hack’ it with a dispersion screen: explanation here.) - Use bleached papers (the brown ones always give off some taints)
- Obviously, you need a digital scale and a timer.
- Use soft water with a TDS between 50-80 ppm
Pour Over Coffee Instructions
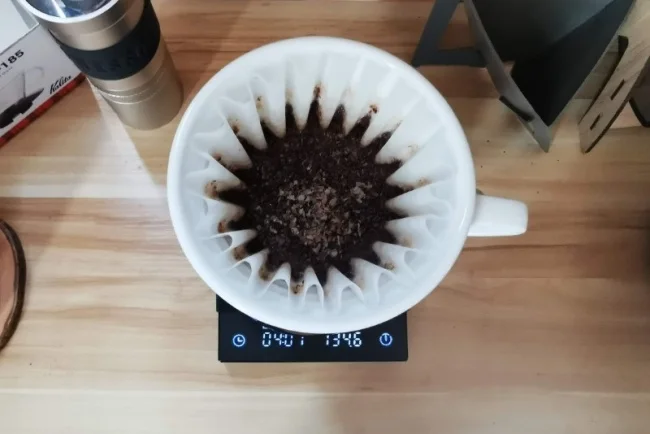
STEP 1: Blooming
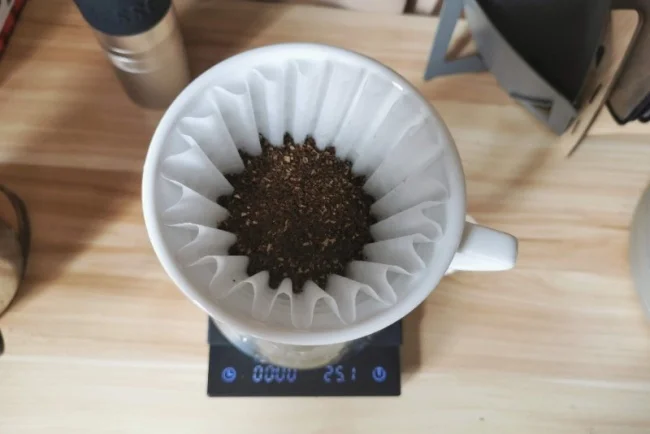
Dose:
- 25 g of coffee to 400 ml of water for the ideal 1:16 ratio (or adjust depending on desired strength)
- Grind-size: Medium fine
In the blooming phase, the goal is to wet all coffee. This will release carbon dioxide, help to avoid channeling and ensure that all grounds begin extraction at the same time.
- Pour 75 grams of water on the bed of coffee.
- Start your timer and wait 45 seconds.
This translates to blooming with 3 x coffee weight.
So if you were brewing a smaller batch of 20 grams of coffee, you’d pour 60 grams of water for the pour.
STEP 2: Agitation
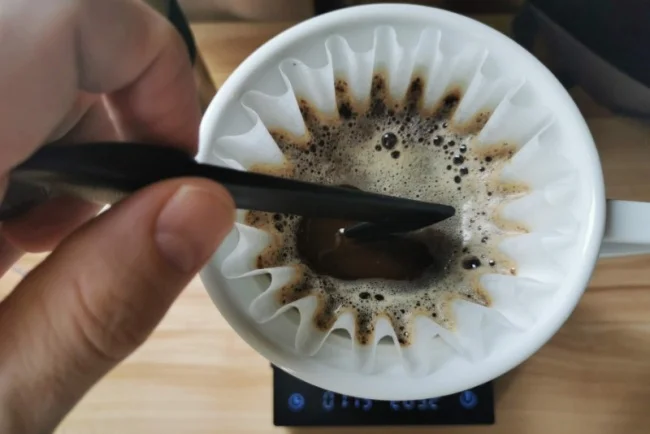
In this phase, the goal is to raise the temperature of the slurry and to incorporate all the grounds at the same time.
- With a gooseneck kettle, pour 5 times the dose (or if it’s easier to calculate — until you have reached 50% of your total water weight). In our example, this is at 200 g.
- Then stir the slurry with a spoon or swizzle stick. Use two stirs in a controlled forward motion. It’s essential to keep the agitation consistent every time.
- Wait for ten seconds before proceeding to the next step.
STEP 3: Percolation
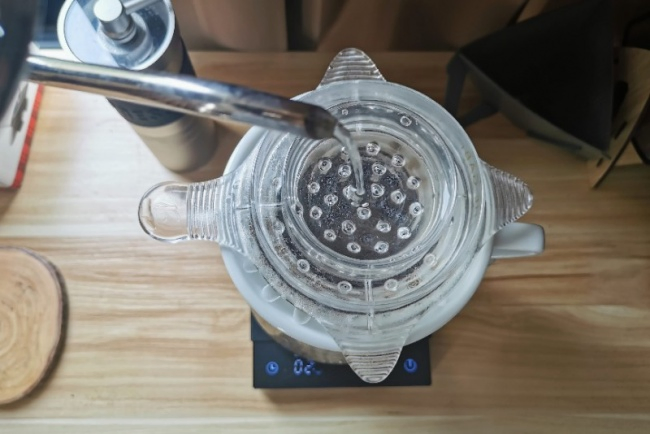
- Put the Gabi Dripmaster B on top of the brewer. Tare the scale to zero.
- Now, add 120 ml of water. This will fill the inner and outer reservoir of the Dripmaster.
- Keep the inner water reservoir filled for the remaining brew. Top it up every ten seconds. When your scale has reached 200 grams, you’re done.
The brew should finish at 3:15 to 3:45.
Swirl and serve
Make sure that the coffee is mixed adequately and aerated slightly before serving.
- Swirl it around in the range server.
- Pour into a ceramic cup with a wide mouth and enjoy.
Tips and tricks: Pour Over Coffee to Water Ratio
The idea of this method is that it’s very consistent while still obtaining ideal agitation. You want a bit of agitation in the first half of the brew while you want minimal amounts in the second half. This brewing pattern creates a consistent cup that has a very long and clean aftertaste.
However, not all coffee beans are the same. Depending on what you have at hand, you can take the brew in two different directions — some beans will respond well to the first approach and some to the second. Or you can stay in the middle and achieve a somewhat balanced cup.
- Fruity & tea-like: For this kind of cup expression, grind coarser. Go with a brew ratio of 1:15 or even 1:14 if you use a very coarse grind (what people sometimes call a French press grind size). You will get a sweet cup, with low body, clean sweetness and high acidity.
- Chocolaty and intense: If you crave an intense mouthfeel and more prominent notes of chocolate and caramel, go for a finer grind and a brew ratio of 1:16,6. The sugar browning flavors that are created during roasting, take a bit more effort to extract. For that reason you will have to grind a bit finer. In order, not to overwhelm, dial back on the dose.
The Best Way to Make Pour Over Coffee?
This recipe will work well with other flat-bottomed brewers that resemble the Kalita Wave, such as the December, Lily and the Blue Bottle Pour Over Dripper.
You can use the Gabi Master B with almost any dripper as long as it’s not too wide, but you will probably need to adjust the pouring pattern, depending on the shape.
With some of the cone-shaped pour over coffee makers such as the Hario V60, you should only pour in the inner water reservoir in step 3 to ensure that water isn’t bypassing the brew.
But if you keep the parameters similar to what I have outlined in this brew guide, I’m sure you’ll experience some of the best and most consistent pour over coffee imaginable. Good luck!
insert insertdddFAQ
Because of the distinctions in brewing techniques, pour overs will in general have more flavor than standard drip coffee. Since the brewing procedure is more precise, the flavor tends to be multi-layered and exciting. This is because the water has more opportunity to pull the flavors and oils from the grounds.
Normally pour over or drip coffee will contain the same caffeine content as instant coffee. However, this also depends on the amount of coffee you use, and whether the instant coffee contains Robusta, which is stronger than Arabica coffee.
It permits you to pull out a bolder and richer flavor from the grounds. In spite of the fact that it would take somewhat shorter compared with drip coffee machines, a pour over permits you to control the speed of pouring water to your coffee. Among coffee snobs and connoisseurs pour over is the method of choice.
