
The DeLonghi Stilosa is one of the cheapest espresso makers around.
So that begs the question: Is this just a toy or actually a useful appliance?
Can it even pull a decent shot? My gut reaction was, probably not, but then again, there’s a reason that I have a coffee blog and that’s to test things like that.
So I bought a Stilosa and spend several months with it.
It turned out after a bit of tinkering I was able to pull shots with an impressive 22.7% extraction yield. That’s good. That’s a pro-level extraction!
In this review, I’ll take a thorough look at the pros and cons of this cute little machine.
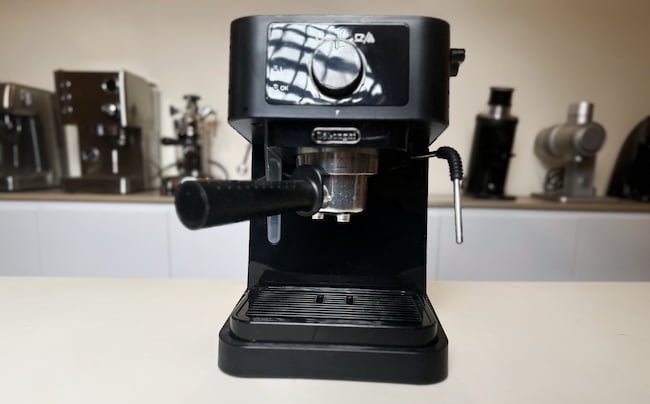
A cheap and cheerful espresso maker.
It looks basic and flimsy but the downsides of the DeLonghi Stilosa, can also be turned around and seen as strengths.
With a bit of patience and courage, you’ll be able to pull great shots with this tiny espresso maker.
amazon Seattle Coffee GearAbout Delonghi
DeLonghi is an interesting brand. If I had to make a bet, I’d say that most people starting their espresso hobby begin with a DeLonghi. On the other hand, most people who stop their espresso journey probably also do it with a DeLonghi. What I’m trying to say is that this brand is sort of the king of entry-level espresso makers – with everything that entails. From fun and fulfillment to failures and fiascos
Despite being used to much more expensive and advanced espresso makers today, I still have pretty fond memories of one of my first espresso makers I owned from the brand: the DeLonghi EC200.
I had picked it up after my Francis Francis X1 broke down out of nowhere.
The DeLonghi was much cheaper and looked more plasticky, but would survive for many years, until I eventually ran out of space in the kitchen and gave it to charity.
I’m sure most people have similar stories.
While DeLonghi might be known for entry-level plasticy espresso makers, today it’s one of the biggest home appliance players, owning both Braun and Kenwood.
And what should be even more surprising to espresso enthusiasts is that they also own the majority of La Marzocco, a brand inextricably connected to specialty coffee and the espresso culture boom over the last 25 years.
So on the surface, DeLonghi might seem basic, innocent and vanilla. But rest assured that some efficient engineering and business minds run the company.
First impressions
Unboxing the DeLonghi Stilosa is a straightforward yet delightful surprise.
Inside, I found the instruction manual, the machine itself nicely wrapped in plastic, and securely packed with cardboard to prevent any damage during shipping.
The machine is small and very lightweight – almost flimsy you could call it. Unwrapping it, I discovered the power cord taped down and several items in the reservoir, including a tamp/scoop combo and the portafilter with its basket.
The tamper/scoop combo-tool is lightweight and let’s be frank, basically a joke, but luckily it’s very easy and affordable to find much better accessories in the 51 mm size.
But there was a nice surprise.
I had ordered the Stilosa without really studying the product listing, thinking that there was only one Stilosa – the 260BK which is sold all over the world. However, the machine I received was a slightly different model; the 230BK.
This machine also comes with a single hole steam wand instead of the pannarello that is more common on entry-level machines. It also comes with a standard basket instead of the pressurized version that I expected.
All this was great news!
I was already planning on modding the espresso machine to be this exact way, so it’s a big help that it has the configuration out of the box.
A regular steam tip and non-pressurized basket will provide much more control over the brewing and steaming process, so I can’t stress how great this is.
Unfortunately, I later realized that this 230BK is only available in Europe and Asia, and not yet in the US. On the flip side the 260BK appears to be quite a bit more affordable to buy in the States.
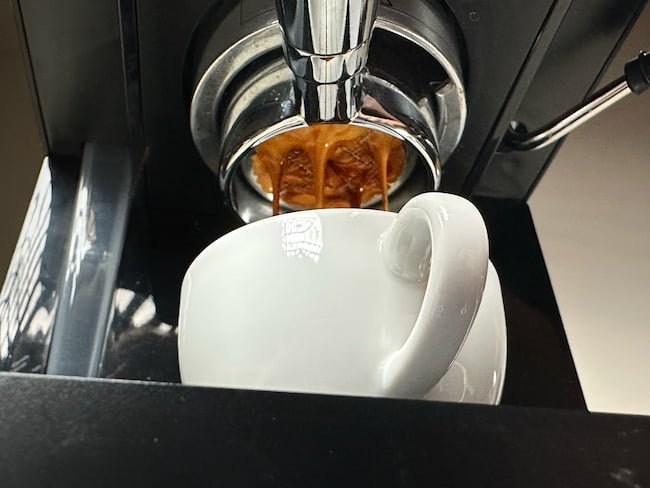
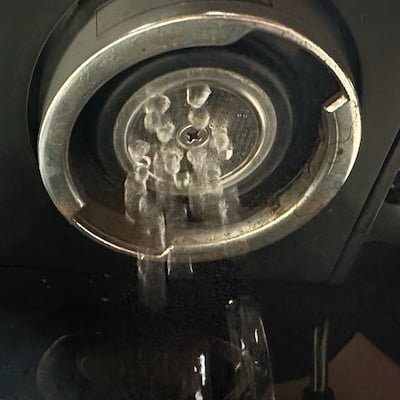
Before using the machine, I followed the instruction manual to prepare the machine, which involved filling the water reservoir, running water through the portafilter, and repeating the process as recommended. It was fascinating to see the water run out of the tiny little dispersion screen on the 51 mm group head. It seems a bit over the top to call an espresso machine cute, but that was the first thing that struck me.
In daily use
The DeLonghi Stilosa turned out to be a convenient machine as I started to test it more. Being so small, one of the major benefits of the device is that it has a very fast heat up time compared to traditional espresso machines. My Lelit Mara X takes around 25 minutes to reach optimal temperature, so only having to wait 3-5 minutes for the Stilosa is a plus. Of course, thermoblock machines such as the Breville Bambino Plus are even faster, but a few minutes is okay. Then you can grind your beans and prep the puck in the waiting time.
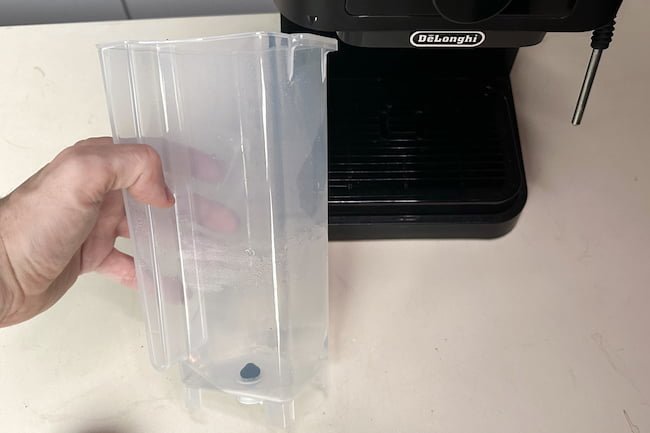
The device boasts a decently sized 1-liter water tank that is removable for easy filling and cleaning. The machine’s front is also designed so the water level is visible at all times.
When you lift the lid to enter the water tank, there’s also a convenient space where you can store extra baskets.
The Stilosa actually has a real single boiler with around a 150 ml capacity. That’s pretty small, being around half the capacity of the Rancilio Silvia. However, the Gaggia Classic Pro has an even smaller boiler, so it’s not that bad.
The boiler sits right on top of the brew group, which is great news, because this ensures a very high temperature that is maintained from boiler to dispersion screen – and all the way to the portafilter (if you remember to lock it in for preheating.) One of the enemies of sweet and well-extracted espresso is low temperature, so you want to ensure a reasonably high temperature. Especially, if you’re brewing anything lighter than charcoal.
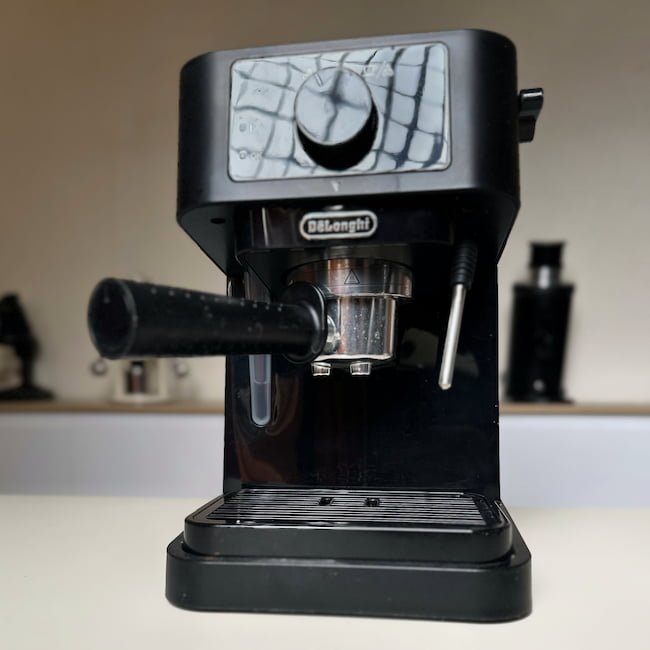
The machine’s simple control panel consists of a single selector switch, allowing you to easily choose between espresso brewing and steam modes. The machine automatically targets the correct brewing temperature, so when you flip the switch to brew the machine will begin to pump out water.
If you flip the switch to steam on the other hand, it will tell the boiler to start increasing the temperature so steam can be produced. Then when the right temperature is reached, you will see an okay light that indicates that the machine is ready to steam.
This system is very standard for single boiler machines – and it’s something real espresso geeks don’t love. Using a single boiler espresso machine is more cumbersome than using a dual boiler or heat exchanger.
With a single boiler there will always be some waiting time for the machine to heat up when you transition from brewing to steaming and back again. This means that you need to factor in these steps in your brewing routine. It also means that making back-to-back shots is a bit annoying.
The good thing about the Stilosa, though, is that the machine and the boiler are so tiny – there’s not a lot of thermal mass to heat or cool down, so the transition is faster than what I have experienced with the Rancilio Silvia and the Gaggia Classic Pro. These two machines are often considered to be the ultimate entry-level machines because they have some pro features such as a 58 mm portafilter, and are made out of premium materials. But the downside of those machines is that they are sitting between two chairs. Since the Stilosa is so small and flimsy, it’s actually less problematic for it to be a single boiler since it can react faster.
Workflow
Using the Stilosa is straightforward, even for beginners.
To pull a shot of espresso:
- fill the portafilter with ground coffee using one of the included baskets,
- tamp it with the provided tamper
- (optional) turn on the machine for 5-10 seconds to flush/purge out the boiling hot water
- Then lock the portafilter into the group head
- Then, use the selector switch to choose the espresso brewing mode and let the machine work its magic.
If you’re in the US and you have a pressurized basket with your machine, then you can use pre-ground coffee.
The resulting shot will have some crema but it will be more foamy and bubbly, and not what we would call “authentic crema”.
If you have the Stilosa 230BK then you have “real” baskets. With those, the ground coffee in the basket will create the pressure in the system. To really get the full benefit of these baskets you should have a grinder that can grind fine enough for espresso. The resulting shots have impressive crema.
Since the Stilosa is a single boiler with a thermostat (and not a precise PID) it has a tendency to get too hot like most of the machines of its type.
It’s a good idea to check the temperature of the machine by running a bit of water through the group head into an empty cup just to see if the temperature is too hot. If the water coming out from the dispersion screen is almost foaming and running together in a single stream, then flush a bit more water through it, until you see the stream a bit more dispersed. That means the water will not be too hot. You should then brew immediately after.
Milk steaming
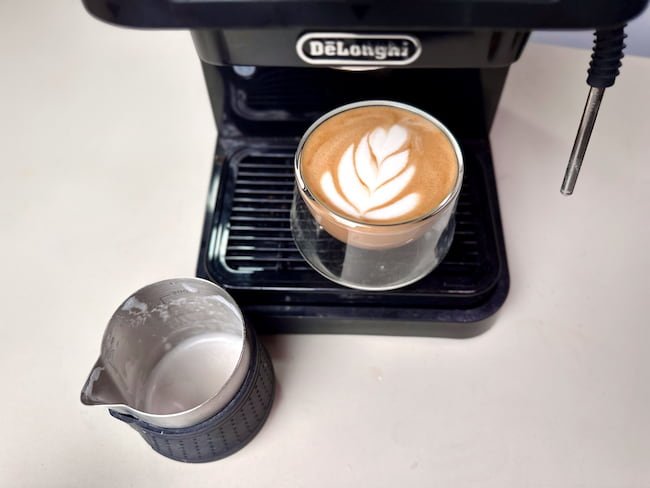
For milk-based drinks, switch the selector to steam mode and wait for the machine to reach the appropriate temperature. Purge the steam wand to check that no water is left in the system, and then insert it into a pitcher of cold milk, just below the surface. As the steam enters the milk, it will create a vortex, incorporating tiny air bubbles to produce a silky microfoam. Once the milk reaches the desired temperature, pour it over your espresso to create a cappuccino or latte. I recommend that you don’t go over 60 degrees Celsius, since that will make it taste weird, almost a bit cloying.
Cleaning and maintenance are also easy with the Stilosa. The drip tray catches any spills or drips and can be removed for emptying and cleaning. The steam wand should be purged and wiped clean after each use to prevent milk buildup.

Steaming worked out decent enough for smaller quantities of milk. The steam wand is not very powerful, so your results may vary a lot if you’re trying to deal with a big amount of milk for a “venti latte”.
I was able to steam 120 ml oat milk to 57°C in 35 seconds. This added 11.3 ml of “wet steam/water” to the oat milk, which is pretty average.
Overall, it will be a challenging machine to become a latte art master on, however, if your goal is just to get a decent milk-based drink, then it can definitely do the job.
In my case, the milk was rather foamy and messy. It’s not easy to control a single hole steam wand, in my opinion. Plenty of power and a 3 hole steam tip is easier.
But with some grooming and skimming off, you can pour some latte art.
Disclaimer: I should add that I’m not much of a latte artist myself, so I’m definitely not ruling out that more skillful folks might acieve much more impressive results!
For people with the 260BK version that has the pannarello steam wand the milk will probably be even harder to control and more bubbly. However, it’s possible to remove the pannarello for a slightly low-tech (and ugly) mod.
It takes around 35 seconds to get the steam wand up to temperature after brewing, which again, seems very reasonable for a single boiler espresso machine.
Overall, the device gets below average points for its steaming performance. But then you remember the price point, and then it’s suddenly forgiven.
Modding the Stilosa
One of the most fantastic things about the Stilosa is that you can do some pretty cool things with it.
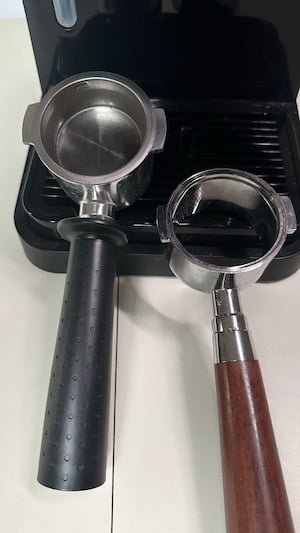
The first thing I’d recommend everybody doing is to buy a naked portafilter. This isn’t just about style; it’s about substance.
Yes, it lets you have a good look at the extraction process in all its glory, but there are many other benefits to using naked portafilters – benefits that can significantly enhance your espresso experience. You can dive deeper into these advantages here.
But, why specifically for your Stilosa? Well, it allows you to use other 51 mm baskets that don’t really fit in the stock portafilter.
This was a game-changer for me.
After I got the naked portafilter, I could suddenly use my nice 51 mm IMS basket. This tweak might seem small, but it’s mighty.
You can grind much finer, and this simple adjustment transforms your Stilosa, elevating it to the realms of a professional machine.
⚠️ Heads up: if you’re on the lookout for a bottomless portafilter, ensure you get the right one: Correct version.
It has two lugs instead of three, which is a detail some might overlook, especially since some other 51 mm DeLonghi models (like the Dedica) have three.
Pressure profiling
Typically, pressure profiling is a feature found on much more expensive machines. However, with the Stilosa, users can experiment with their own version of pressure profiling. This is possible because the machine lacks a solenoid valve to remove water from the group head after switching back to standby mode, a common feature in most espresso machines that prevents pressure maintenance and affects puck integrity.
- Step-by-Step Guide:
- Start by switching to brew mode for a few seconds.
- As soon as the first drips are visible in the naked portafilter, cut off the pump.
- Wait for 10 seconds to allow for preinfusion.
- Engage the pump again until the flow begins to form at the naked portafilter.
- Close to reaching the target brew weight, cut off the pump once more and apply a declining pressure profile.
Techniques like pressure profiling not only make using the Stilosa a fun experience for advanced espresso enthusiasts but also help to mitigate the effects of the machine’s high pump pressure.
Factory settings put the pump at 15 bars, higher than the 6-9 bars typically preferred among espresso aficionados. Yet, by strategically managing pump usage in this on-off manner, you can avoid exposing the puck to excessively high pressures. While this approach does involve some guesswork and trial and error due to the absence of a pressure gauge, it can yield excellent results with practice.
Advanced testing
The machine is designed with a notably slow water debit, clocking in at 184 ml per minute. This feature grants users ample time to fine-tune the pressure profiling during use. Typically, the standard water debit for machines of this type is around 400 ml per minute. However, this machine’s combination of a 51 mm portafilter and a 15 bar pump suggests that the reduced water flow could actually be advantageous for extracting the perfect espresso shot.
Temperature Consistency and Management
In my endeavors to test the temperature stability of the Stilosa, I faced the challenge of operating without a scace device. Despite this, it became evident that the machine tends to operate 3-4 degrees Celsius higher than my Lelit Mara X, which is calibrated to remain within 93-94 degrees Celsius. This discrepancy was particularly noticeable when the machine was left idle for extended periods. As a result, I’ve found that it’s prudent to initiate a brief water purge until the flow consolidates into a more distinct stream. This practice ensures the machine reaches the desired brew temperature without overheating.
Achieving Optimal Extraction
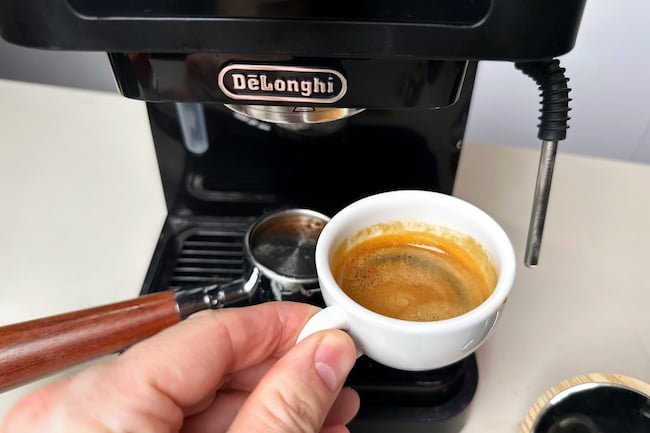
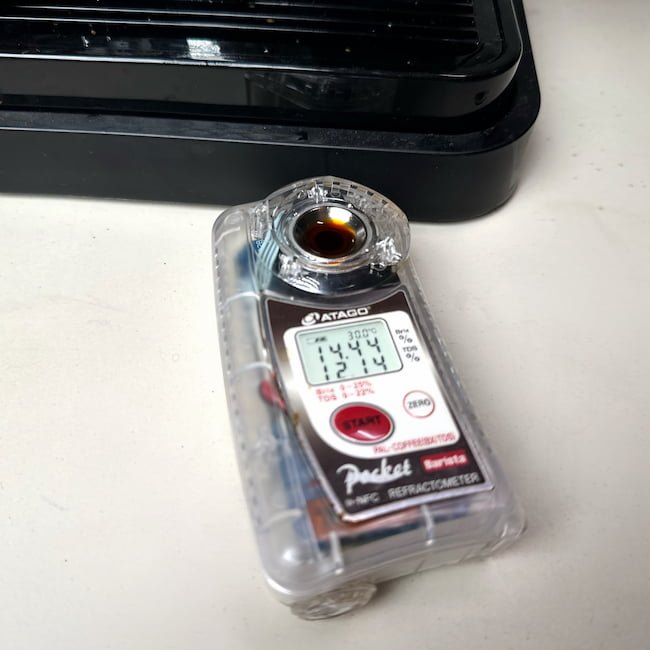
Utilizing the naked portafilter in conjunction with an IMS basket allowed for an exemplary espresso extraction quality. I managed to pull a shot with a Total Dissolved Solids (TDS) of 12.14 for a 14 g in, 26.5 g out shot. This resulted in an impressive 22.7% extraction yield, underscoring the machine’s capability to deliver high-standard espresso extractions.
Post-Steam Temperature Recovery
It’s worth noting that after steaming, the machine requires a purge of approximately 60 ml of hot water, or about 20 seconds, to return to the optimal brew temperature. This is a relatively standard expectation for single boiler machines and ensures the machine is ready for the next extraction without the risk of overheating or underextracting.
Here’s my video of an advanced Americano-technique demonstrated on the DeLonghi Stilosa
Conclusion
Overall, the DeLonghi Stilosa offers great value for the money. In today’s economy, where prices seem to be constantly on the rise, it’s refreshing to find a product that delivers quality without breaking the bank. To put it into perspective, the cost of the Stilosa is roughly equivalent to a mediocre Italian dinner for two at a mid-range restaurant in a European capital.
When you compare the Stilosa to the manual lever espresso makers currently in fashion, such as the Flair, Picopresso and so on, then you get so much technology for the money: You get a boiler and a steamer and a pump. You won’t need to mess around with preheating or separate milk foaming solutions (such as the Nanofoamer).
Yes, I’d even say you can make some really, really solid espresso if you’re just willing to spend a bit of time to get to know the machine and learn about its quirks – perhaps invest in a precision basket.
In Europe where the machine comes with the slightly more “pro” configuration, I think it’s an enticing deal.
But everywhere in the world there are people who want to make espresso on the cheap. And if that’s you, then I think you should consider this machine, as it definitely punches above its puny weight class.
Check price
👉 Amazon
👉 Amazon Germany (Euro Version)
