Some people say that the smell of freshly baked bread is the smell of happiness. While I wouldn’t disagree, I’d say that one smell is superior.
And that is the smell of freshly roasted coffee.
Unfortunately, most people don’t realize that roasting coffee at home isn’t much more difficult than baking bread. In some ways, it’s even easier!
I have been roasting coffee for more than 10 years – here’s my guide on how to do it at home.
Why should you roast coffee at home?
Now, like I said the aroma in itself is a great reason to roast coffee at home. But there are a few other arguments that might convince you to give it a try.
- Freshness: You’ll always have freshly roasted coffee at home. Coffee tastes better when it’s less than two weeks old. The only other way to get coffee this fresh is by regularly visiting a specialty coffee roaster.
- Knowledge: When you roast the same coffee in many different ways you’ll learn about coffee in new ways. You’ll realize how much of the coffee beans flavor is inherent and what aspects can be modulated through roasting. If you’re a real coffee geek, this is one of the most efficient ways to learn about the magic of the bean.
- Price: It’s cheap! Often you can save a lot of money by roasting your own coffee. Typically, green beans cost one-fourth of the roasted ones.
- Fun: Roasting coffee can be your new hobby. Seeing the beans change color, hearing them pop, and then enjoying brewing them is a lot of fun.
From green bean to roasted coffee
Coffee beans are in spite of their name actually not beans. Instead, they are seeds inside a coffee cherry.
The main job of the farmer is to grow ripe and flavorful cherries, and then separate the seeds from the pulp. This is a longer process than you might think because the seeds are covered by a layer of fruit slime as well a protective layer of outer skin.
After all, this has been removed, and the moisture content of the seed has been dried down to 10-12 % we call it ‘green coffee’ even though the color is usually more of a pale yellowish or grey.
Green coffee is pretty stable and can keep fresh for 18 months when stored properly. One of the most critical jobs coffee roasters face is to buy high-quality green coffee.
View this post on Instagram
Roasting is both art and craft
Since green coffee is much like an uncooked steak or potato, it needs to be cooked so we can enjoy it.
This is where roasting comes into the picture.
Roasting is about applying the correct amount of temperature in the proper amount of time to bring out the most outstanding flavors of the coffee bean.
- Too much heat and you’ll end up having coffee with a bitter charcoal flavor.
- Too little heat and you’ll have coffee that tastes very acidic and grassy.
Both these results are pretty awful, so the roaster’s job is to find somewhere in the middle. However, it’s not an easy job to decide exactly where a coffee find its peak tastewise, so the roaster is in a sense also an interpreter of coffee.
Not all green beans react the same way when they are exposed to heat, so it’s common for roasters to do smaller sample roasts, so they are able to pinpoint the perfect window for any given bean.
The stages of coffee roasting
When you’re roasting coffee at home, your approach will be less scientific and systematic than a professional roastmaster. However, you’ll still follow the typical stages that a green bean will undergo to become a roasted coffee bean.
- From green to yellow: The coffee beans slowly lose the original coffee greenish hue and become yellow and grain-like. This usually happens during the first 2-3 minutes depending on your roasting machine.
- Yellow to brown: Around 3 to 4 minutes in the beans will start to give off the last bits of moisture, and you’ll be able to see a bit of steam if you’re using a drum roaster. After the steam has disappeared, the browning will occur more rapidly. This is called the Maillard reaction; it’s the same kind of browning that happens when you bake bread or cook a steak.
- Brown to first crack: Around 6 to 9 minutes in, a new kind of chemical reaction occurs; caramelization. This adds sweetness and complexity to the coffee flavor. Shortly after this point, the beans will start popping like popcorn. This is called the first crack, and it’s an essential hallmark in the roasting process. It usually begins when the beans reach a temperature of 205°C/401° F. If you stop the roast right at this point the coffee will be considered very light roasted.
- At the end of first crack: A good rule of thumb with many coffees is to roast at least 90 seconds more after the first crack while keeping a close eye at the temperature. You want the temperature to increase but not too rapidly. If you drop the coffee at 220°C/428°F, the coffee would often be considered a medium-light. At this stage, the coffee will taste sweet, complex and clean with a long aftertaste.
- Towards the second crack: After the first crack, the coffee will rapidly absorb heat and go from light brown to dark brown. The surface will become more smooth and shiny. The coffee will lose some sweetness and acidity and take on more of a ‘roasty’ flavor. Coffee at this stage is often called ‘full city.’ It’s often useful for espresso, Moka pot, and French press.
- Second crack: At this stage, the coffee beans have a different chemical reaction; the popping sounds are more shallow and sharp compared to the first crack. It’s easy to burn the coffee at this stage so be cautious. The beans that have been taken to this stage will look shiny and oily a few days post-roast. The flavors will be powerful, intense and slightly bitter. The primary use of beans roasted this dark is as espresso-based in milk drinks such as latte and cappuccino.
3 ways to roast coffee at home
Whether you’re roasting coffee at home or on professional equipment such as a drum coffee roaster, the process always follow the trajectory outlined above.
One of the significant differences, however, is that professionals are able to control the temperature much better because they have both airflow and burners that they can increase or decrease during the roast.
When you’re roasting at home, you’ll usually only be able to control temperature. You can still make very delicious roasts, often you’ll just have to plan ahead and be attentive to the bean’s progress.
There are three popular ways to roast at home:
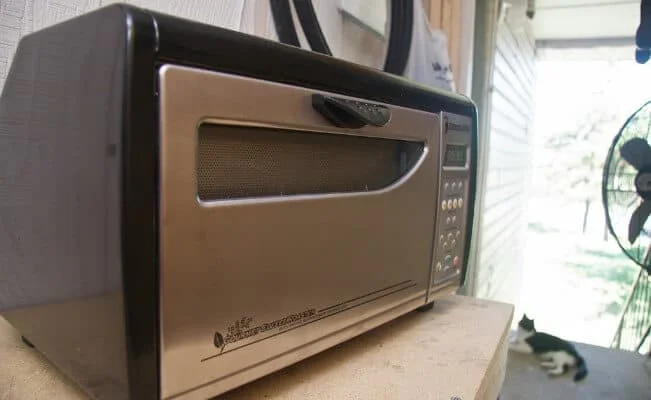
- In the oven: This is the easiest way to get started since you don’t need any additional equipment. Some ovens tend to cook a bit uneven, but you can still get good results by stirring the beans every 3-4 minutes. Preheat the oven to around 215°C/420°F on hot air mode. Pour beans on a heating plate (preferably perforated) and keep a close eye on them. Stir them around once in a while. Finish the roast after the first crack has been rolling for one to two minutes.
- In a popcorn machine: This method is prevalent because it’s both reliable, cheap and cheerful. Often one can find second-hand popcorn machines in a thrift store. The air will circulate the beans while cooking them and creating a good even roast. This method is rapid though; sometimes you’ll have coffee ready in just 4-5 minutes. The main downside is that the coffee can get burnt quite easily or that your machine can overheat and shut down. Also, the capacity tends to be quite small at around 100 grams at a time.
- On a home coffee roaster: If you enjoy roasting coffee at home either in the oven or with a popcorn machine, chances are that you’ll eventually want to upgrade to a home coffee roaster. With a dedicated tool, you’ll have much more control over small changes in temperature, and you’ll be able to create roasts that match your local coffee shop. Often a tiny coffee roaster will pay for itself in the first year just from the savings you make on green coffee vs. roasted.
Learn More: Light vs Dark Roast
There are two main types of home coffee roasters; drum roasters that are essentially smaller versions of the models that the professionals use. Hot air roasters are on the other hand closer to popcorn machines in their design.
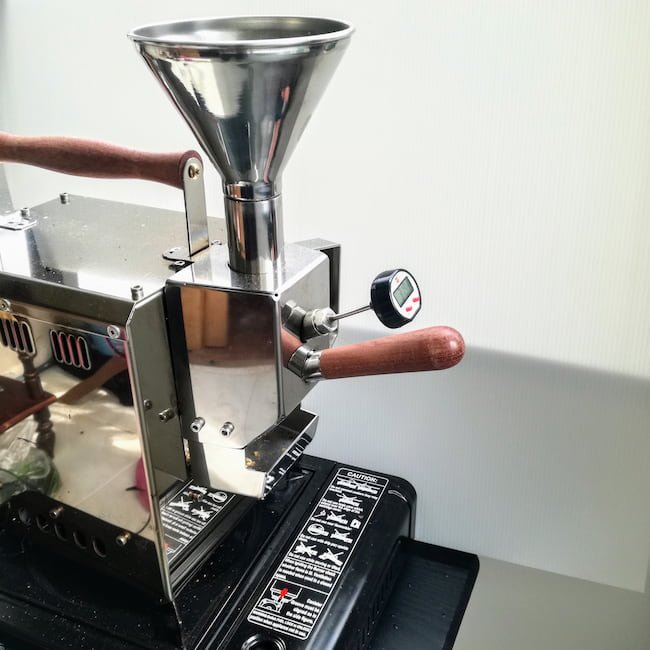
Both have their pros and cons, so it’s hard to say that one is better than the other. Hot air roasters tend to be cheaper and faster, while drum roasters are great if you really want to learn the craft of coffee roasting. The model in the picture below is a Korean model named Kaldi Wide. I have had one since 2017, and it has been a great companion in my progress as a roaster.

Final words: Home coffee roasting
Roasting coffee at home is a gratifying hobby. If you’re the kind of person who enjoys baking your own bread or brewing your own beer, chances are good that you’ll appreciate the art of coffee roasting.
Like I said before, drinking freshly roasted coffee is a magical experience that you owe to yourself to try at least one time in your life.
Buying a kilo of green coffee for oven roasting at home will allow you to get your feet wet with a minimum of financial commitment.
There’s a decent chance that you’ll enjoy the process as well as your morning coffee, so I can only give you my blessings.
If you want to geek out and learn more about roasting, check out my post on light and medium roast profiles.
If you want to know how the professionals go about roasting, make sure to read this post from the South African coffee company, Quaffee.
Top Featured Image: N. Lundgaard | Flickr CC | Source
FAQ
Roasting times differ, depending on the strategy and batch size however you can anticipate that the procedure should last around 10-12 minutes for a small batch. The result also depends on your equipment and your preference when it comes to roast level.
The oven is popular and easy since most people have one. Getting a cheap popcorn machine is a different popular approach that can yield great results.
For the best flavor, coffee needs at least 24 hours rest in the wake of roasting before it is brewed. You can drink it before this point however the body and flavors truly won’t be as developed. The beans will still change flavor during the first weeks.
